Connecting to the Gateway
When the Gateway service is up and running, navigate to the AcuToWeb start page using the syntax:
http://[server ip]:[configured port]
The default value is http://127.0.0.1:3000.
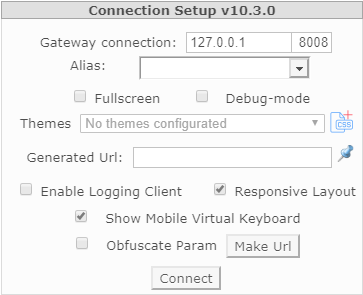
The Connection Setup dialog box appears, which confirms that the Gateway is running:

From this point, you can use the following options to create a URL that can be distributed to your end-users; they can paste the URL into their browsers to run the application that the alias refers to:
| Option | Description |
|---|---|
| Gateway connection | Specifies the host name or IP address, and port number of the AcuToWeb Gateway. These values are taken from the gateway.toml configuration file. |
| Alias | Specifies the alias of the AcuConnect to be executed. By default, this option is empty, but you can populate a list of values
by adding them to the
fillCombo.js file. By default, this file is located in the
AcuToWeb\Web\js sub-directory of your installation path, but you can use the PATH_FILL_COMBO
option in
gateway.toml to use a
fillCombo.js file at another location.
The following excerpt adds aliases for the Calculator and Tour applications: [
{"type": "category", "text": "Main Applications"},
{"type": "elem", "text": "Calculator", "value": "calc-alias"},
{"type": "elem", "text": "Tour", "value": "tour-alias"}
]
You can also type an alias name into the field, then click Make URL, which will generate a URL that you can distribute to customers, which will allow them to paste into their browser and connect to the gateway directly. |
| Fullscreen | When selected, it allows you to toggle Full-screen mode on the browser.
Notes:
|
| Debug-mode | When selected, the ACUCOBOL-GT debugger immediately starts when connecting to the gateway. |
| Themes | Select a theme (.css file) for the application to use in the browser. This option is only available if you have added one or more themes to the service using the CUSTOMIZE_CSS option in the configuration file. |
| Generated Url | Displays the URL required to connect to the gateway. |
| Enable Logging Client | When selected, logging is enabled whilst the application runs. An additional
 (Console) icon is added to the top-right corner of the interface to indicate that logging is enabled. Click the icon to display the
Logging Console; see
Using the Logging Console for more information. (Console) icon is added to the top-right corner of the interface to indicate that logging is enabled. Click the icon to display the
Logging Console; see
Using the Logging Console for more information.
|
| Responsive Layout | When selected, this option disables the zoom in/out functionality. To make your program truly responsive to a variety of screen sizes and viewports, use CSS and ATW-CSS-CLASS/ATW-CSS-ID control properties in addition to enabling the Responsive Layout option. |
| Show Mobile Virtual Keyboard | Displays a mobile virtual keyboard when connecting through the gateway on a mobile device, to help navigate the application. This option is enabled by default, but will not have an effect if not connecting on a mobile device. |
| Obfuscate Param | Encodes the URL parameters using the Base64 encoding scheme, so that when a URL is distributed, the specific details are not readable (without first being decoded). Click Make Url to generate an obfuscated URL. |
| Connect | Connects to the gateway using the parameters provided. |