Emulating workgroups in Eclipse
The following is an example of how you can set workgroup levels Enterprise Developer. There are numerous other ways in which the projects can be configured to work in this type of system. You can add a larger number of additional directories to each copybook project (either as relative paths to the workspace variable or as variables in their own right) which would allow for even more configurability.
Introduction
Enterprise Developer does not provide the Mainframe Express workgrouping mechanism out-of-the-box. It can be emulated, though.
There are a number of features in the Eclipse framework, many of them relating to how projects are created and operate together, which can help in creating a workgroup environment.
Using COBCPY
The Micro Focus Compiler uses the COBCPY environment variable to find all of the copybooks used in a program compilation. Setting up a workgrouping environment by setting COBCPY so that the IDE can inherit the settings has a few disadvantages.
- The IDE is not aware of any of the copybook locations used in the application which can lead to undefined behavior.
- The COBCPY path is typically of such a length that some of the tools cannot handle, which could lead to unexpected behavior.
- Each paths defined in COBCPY will always be searched during a when a compilation is performed. With Eclipse using a background parse to provide a number of key features, this can cause excessive delays in everyday operation. Though background parse can be switched off, this means you are not going to receive the instant feedback in the editor.
Using copybook projects
Another approach you can take to include copybooks is to use copybook projects to store your copybook directories. You can then add these projects as dependent projects to any other source projects which allows the IDE to identify the copybooks for build operations.
As you can add multiple paths to each copybook project, each one of these projects can then represent a "level" in the workgroup hierarchy. Multiple copybook projects can then be used to represent the set of levels in a potential workgrouping environment. There are many ways in which the final organisation can be arranged; the important thing is that the IDE 'knows' about the files to be used for compilation.
The following sections show how you can recreate the various workgroup levels and use copybook projects to manage the levels.
Creating folders for the workgroup levels
In your workspace, create folders that will represent your workgroup levels. For example:
- <workspace_dir>\PROD
- <workspace_dir>\TEST
- <workspace_dir>\DEV
Set up the project variables
To avoid having to set too many hardcoded paths, you can use the workspace local variables (visible to all projects) to locate the root directories of the code.
- In the IDE, click the Windows >Preferences.
- Expand
General > Workspace, and click
Linked Resources.
This opens the Linked Resource configuration page:
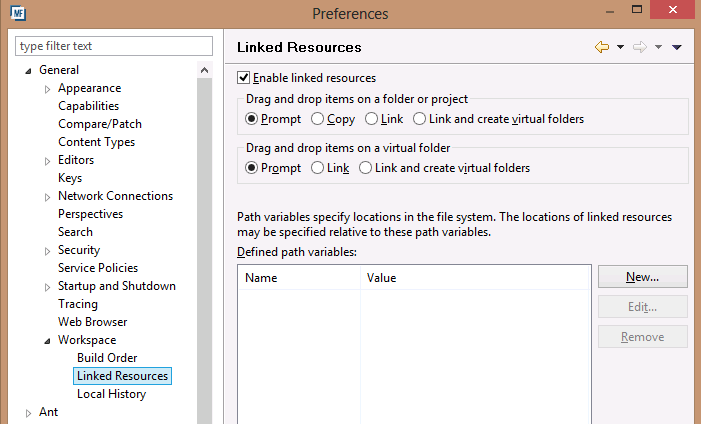
- Click
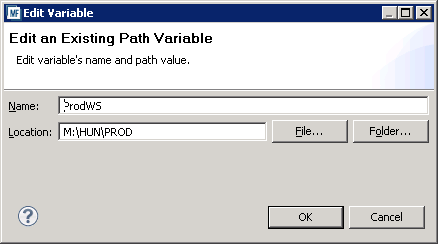
New to create a variable pointing to the root level of the workgroup level you want to use.
You can use a mapped drive letter, UNC name or a predefined location (such as c:\source\prod) which then allows the projects to be shared among multiple users without having to make any changes:
- Repeat for each level that you need to set:
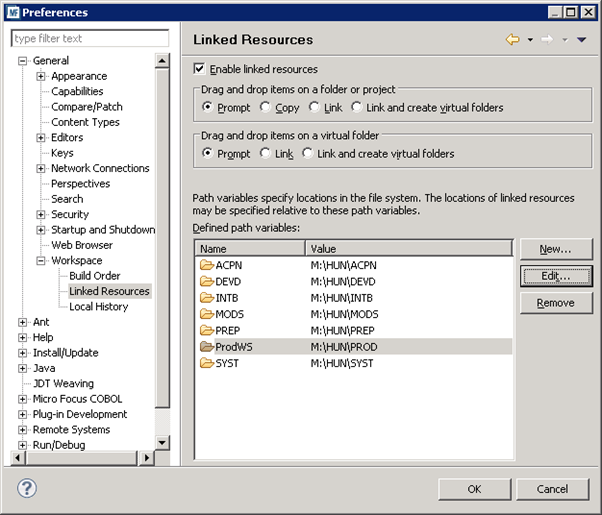
- Click OK.
Remember that workspace variables are each defined on a per workspace basis - in a multi-user environment, each user needs to perform this step themselves for each workspace they need when developing their application.
Create the copybook projects
For each level in the workgroup, you need to create a copybook project. To do this, use the COBOL Copybook Project type and, for each project, give a name which reflects the name of the workgroup level you want it to represent (for example, PROD, INT, DEV).
If you check the properties of a copybook project, you can notice there are no Builders set for it. This means no compilation operation will take place if source code is found in the project location.
Adding files to the copybook projects
The quickest way to do this is by adding a single linked directory item which points to the physical location of the root of the copy file location on disk. If you have never encountered linked resources in Eclipse before, they work in a similar manner to a UNIX/Linux symbolic link.
- Click File >New > Folder.
- Click Advanced and click Link to alternate location (Linked Folder).
- Click Variables.
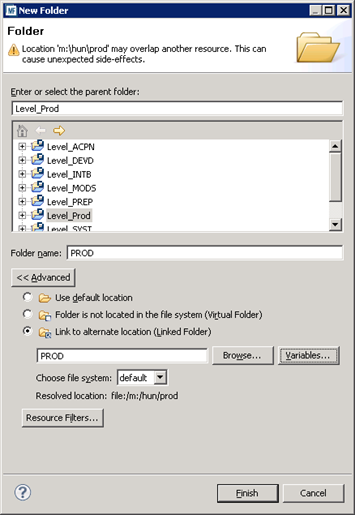
- Select the workspace variable that you created earlier which matches up with the root directory of your workgroup level. In
this case, our variable was called PROD. Click
OK and it should populate the folder dialog as shown below:
- Click Finish.
The IDE inspects the directory hierarchy for recognised COBOL types so they can be identified at a later time when working with your source code.
This project can be treated as a normal COBOL project and can have any directories it contains added to the copy path as well as the ordering of any such directories altered.
- Open the project properties dialog, expand Micro Focus > Build Path, and then click the Dependency Paths tab.
- Set
Path type to
COBOL Copybook Paths tab item
The set of paths that will be added to the copybook path is shown. If necessary, you can reorder the paths as well as enable or disable directories.
The default is not to include any paths so some paths almost certainly have to be switched on. Here is a typical entry for the copybook paths:
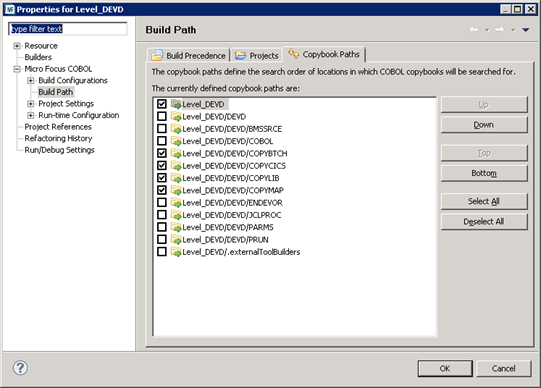
You have now created one level of your workgroup. You have created a single project with a workspace variable pointing to the top level of the physical location of the code for your level in the workgroup. You have also filtered out the COBOL source code items and have defined the copybook directory ordering for this level.
Repeat the same process for each level of your workgroup that you wish to use. In this particular example, there are seven levels defined.
Add the copybook projects as a dependency to a COBOL project
Once you have defined all your copybook projects, you can add them as dependent project to a COBOL project for the source files:
- Create a COBOL project to hold your source files.
- Add the source code items which you are going to working with.
You do not need to add every item in the entire application - just the one with which you are likely to be changing and/or debugging.
- In the project properties, expand Micro Focus, and click Build Paths.
- Click the
Projects tab, and then click
Add.
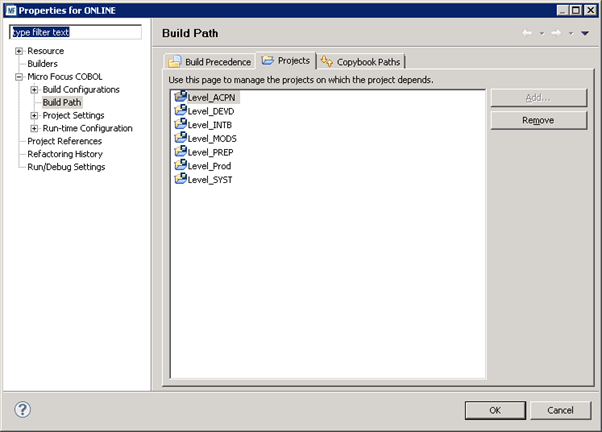
This enables you to select the projects on which this one depends. The following example shows seven levels have been added:
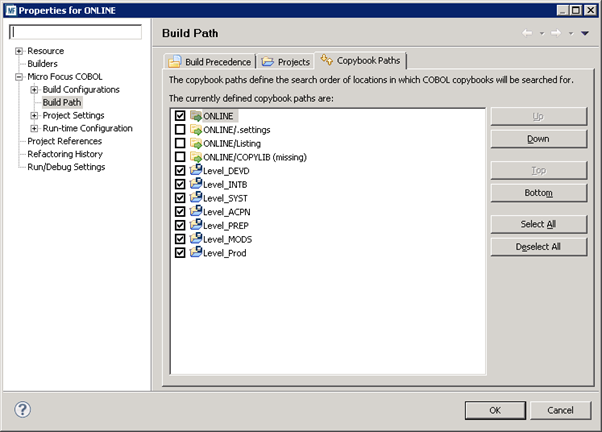
- Click the Dependency Paths tab and ensure Path type is set to COBOL Copybook Paths.
- You can alter the order of the copybook projects as well as turn levels on and off according to what workgroup levels you
may be working with. This provides a highly configurable and user friendly way in which to alter the copybook paths:
Distributing the copybook projects to multiple users
Once created, you can use the copybook projects as any other projects. Due to the way in which they utilize workspace variables, if all users in a multi-user environment are using the same locations for the source code on their local machines (or similarly named mapped drives) then the projects can be easily shared.
If a user imports the copybook projects into their own workspace (provided that they have also defined the workspace variables), then it should be a quick task to configure a workgroup hierarchy for all of your teams. The copybook projects can be committed to SVN (or any other SCCS) and should not have to be changed once created.